|
Backing up and Restoring Databases Using MSDE
SQL Server Desktop Engine (which is also known as MSDE 2000) is a database engine designed to run in the background, supporting Microsoft applications without the need for a full-blown SQL Server installation. Unfortunately, MSDE does not have a user interface of its own, relying on manipulation of the databases to the applications that use it. While MSDE works well, there are administration tasks that need to be performed that are seldom part of an application that uses the engine, and the most important of these tasks is backing up the databases themselves.
Backing up the databases of a SQL Server Desktop Engine tables should be an easy task, but if the Microsoft SQL Client Tools are not installed the process for backing up becomes more complex. In the past, the most common approach to manually performing MSDE backups was to use the OSQL utility and Transact-SQL. OSQL is the only tool provided with MSDE 2000, residing in the \MSSQP\Binn folder under the name 'Sql.exe'. However, OSQL was only included with SQL Server 2005 Express Edition and older SQL Server versions, and not in other versions of the SQL Server 2005 product line. Instead, a new utility called 'Sqlcmd' was added to SQL Server 2005.
The BACKUP Statement
BACKUP DATABASE mydata TO DISK = 'd:\backup.bak'
will back up the database 'mydata' to the specified file. Here, the TO DISK sets the backup device to a local (or networked) hard drive. If you are backing up to a tape drive, the tape device name is specified:
BACKUP DATABASE mydata TO TAPE = '\tapedrive1'
Some backup devices, such as tape, require a specific block size to be explicitly used although the BACKUP statement automatically selects an appropriate size based on the device you are backing up to. You can specify the blocksize, you can append the BLOCKSIZE parameter with an integer for the number of bytes per block (512, 1024, 2048, 4096, 8192, 16384, 32768 and 65536 are allows sizes). The default value, if no overwritten, is 65536 (64kB).
BACKUP DATABASE mydata TO TAPE = '\tapedrive1' BLOCKSIZE=1024
These commands can be executed from a cmdsql or osqp window. For larger command sets, the T-SQL commands can be written into a text document (using Notepad, for example) and then executed with a call to the text file. To start sqlcmd on a SQL Server 2005 machine, use the Start menu, select Run, enter "cmd" to open a Command Prompt window, then type "sqlcmd". This will open a trusted connection to the default SQL Server session on the machine.
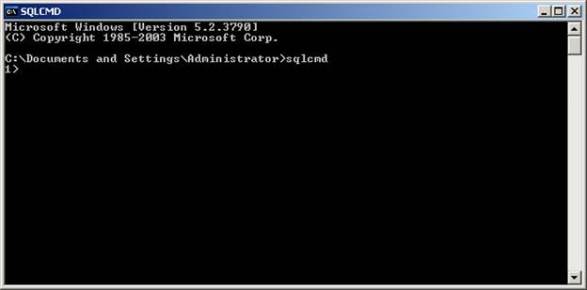
The prompt shows a line number, which increments with each line you type. To exit sqlcmd, close the window or type "exit". If you want to open a connection to a specific instance of SQL Server instead of the default instance, you can add the instance name by using the sqlcmd "-s" option followed by the server and instance names, such as "sqlcmd -s testmachine\sqlinstance1" at the DOS command prompt.
A simple example is to create a backup of the master database to a file called "backupfile.bak". To do this, enter the BACKUP DATABASE command in the sqlcmd window, then type the command "go" to execute the instructions:
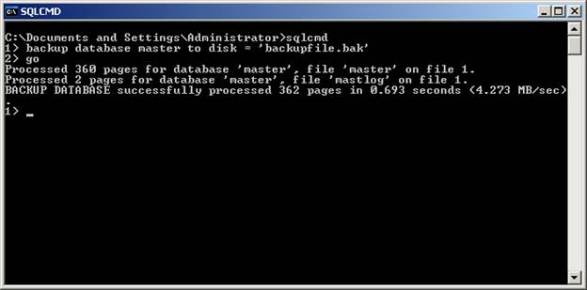
After executing the command with the "go" instruction, the line numbers in sqlcmd are reset to "1". This allows a number of lines to be built up and executed as a script.
Instead of backing up an entire database a file, list of files, or file group can be provided instead by using the FILEGROUP option. To back up a file, use the FILE option:
BACKUP DATABASE mydata FILE = 'myfile' TO DISK = 'd:\backup.bak'
The argument for FILE must be the logical name of the file to be backed up, or a variable that is set to a logical file name. FILE backups are useful when you need to back up a very large file or when performance would be impacted by backing up the entire database.
To back up filegroups, tt is important to note that the filegroups have to be properly defined in order for them to be backed up. For example, if you have a database called 'cds' and you want to back up the filegroups called 'jazz' and 'country' you could use the command:
BACKUP DATABASE cds FILEGROUP = 'jazz', FILEGROUP = 'country' TO DISK = 'd:\discback.file'
The BACKUP DATABASE command will create a full backup unless you use the DIFFERENTIAL option, which causes only those contents of the database or file that have been changed since the last full backup to be archived. To perform a differential backup, you add the keyword to the BACKUP command:
BACKUP DATABASE mydata TO DISK = 'd:\backup.bak' WITH DIFFERENTIAL
The WITH clause allows several other options to be added. For example, to specify a name for the backup set, use the keyword NAME followed by a string of up to 128 characters:
BACKUP DATABASE mydata TO DISK = 'd:\backup.data.bak' WITH NAME = 'Aug 1'
A description can also be added to the backup set, with a maximum size of 255 characters:
BACKUP DATABASE mydata TO DISK = 'd:\backup.data.bak' WITH DESCRIPTION = 'After change to schema'
A password can be added to the backup set to protect the data. Without the password, a RESTORE operation cannot be conducted. To add a password, the chosen string is supplied:
BACKUP DATABASE mydata TO DISK = 'd:\backup.data.bak' WITH PASSWORD = 'secret'
The password protection for the BACKUP statement is weak and can be circumvented. For this reason, the PASSWORD option is dropped after SQL Server 2005.
Multiple options can be added to a command by separating them with commas (and, of course, formatting can be applied to make the statements readable):
BACKUP DATABASE mydata
 TO DISK = 'd:\backup. bak'
 WITH NAME = 'Aug 1',
 PASSWORD = 'secret',
 DIFFERENTIAL
Proper backup routines stipulate that backups must be kept for a specific amount of time before being overwritten. If used, the EXPIREDATE option sets the date before which the backup set cannot be overwritten. The expiry date of a backup can be specified either as a string or a variable:
BACKUP DATABASE mydata TO DISK = 'd:\backup.data.bak' WITH EXPIREDATE = '6/1/2020'
An alternative to EXPIREDATE is to use RETAINDAYS, which uses an integer to specify how many days must pass before the backup set can be overwritten:
BACKUP DATABASE mydata TO DISK = 'd:\backup.data.bak' WITH RETAINDAYS = 100
SQL Server 2005 adds the ability to create a backup of a database or file which does not impact the usual backup sequence. For example, you might want to create a copy of the existing tables, but not have the current copy counted as a backup in a regular backup sequence (in other words, the database's differential bitmap for backups is not updated). To make a copy without considering it a part of a backup set, add the option COPY_ONLY to the command:
BACKUP DATABASE mydata TO DISK = 'd:\backup.data.bak' WITH COPY_ONLY
By default, a backup written to a device that has held previous backups will preserve any existing media headers and backup sets. However, if the FORMAT option is specified, a new media header is created on the backup media. If you do specify FORMAT, any existing backup media sets on the target device will be made unusable because a new header is created.
Instead of backing up databases, you can back up a transaction log instead. The transaction log would allow rebuilding of a database. When backing up a transaction log for the first time, the database must have been backed up first. To back up logs, the BACKUP LOG statement is used instead of BACKUP DATABASE. The same parameters apply to BACKUP LOG as with BACKUP DATABASE.
There are quite a few more options available for BACKUP, but most of them are seldom used.
Restoring Databases
To restore from a backed up file created using the BACKUP DATABASE statement shown above, the RESTORE DATABASE statement is used. The RESTORE statements can be issued from an osql or sqlcmd window, too, or embedded in a script file and executed with a call.
Many of the options and parameters used in the BACKUP statement are carried over to the RESTORE statement, so the syntax is easy to work with. For example, to restore a database, you would issue the command:
RESTORE DATABASE mytable FROM DISK = 'c:\mybackup.file'
This command will open the backup file specified and restore the contents to the file 'mytable'. The RESTORE statement allows you to restore specific files or filegroups from a backup.
On many backup devices, there will be multiple sets of backup files on the device. Usually, there will be at least one master (full) backup and several incremental backups (changes between the master and the increment. To allow you to specify which master and increment file to restore, the FILE option is used with the number of the backup to use. For example, the command:
RESTORE DATABASE mytable FROM DISK = 'z:\backups\mybackup.file' WITH FILE = 2
will restore the second full database backup from the specified location. If you want to then apply an incremental backup over top of the master backup, you would give that file number as well. The command:
RESTORE DATABASE mytable FROM DISK = 'z:\backups\mybackup.file' WITH FILE = 5
would then pull the fifth backup from the location. Of course, you have to know which backups are masters and which are incremental, which should be from a backup log maintained for the system. After performing both the master and incremental restore operations, the database restoration should be completed.
The FILE option also can be used before the WITH clause to specify specific filenames to be restored:
RESTORE DATABASE mytable FILE = 'myfile1', FILE = 'myfile2' FROM DISK = 'z:\backups\mybackup.file' WITH FILE = 2
This command will restore the two files specified from the backup, using the second backup on the restore volume. The FILE before the WITH clause specifies filenames, while the FILE after the WITH clause specifies backup numbers.
SQL Server 2005 uses the concept of a tail-log. This is the last log that would be restored by a RESTORE operation. A tail-log backup ensures that all transactions are backed up, preventing possible damage during a RESTORE by ensuring all transactions relating to that database are available. For SQL Server 2005, if the tail-log has not been backed up an error will be generated unless the WITH REPLACE or WITH STOPAT clauses are used. For this reason, prior to starting a RESTORE, use the command:
BACKUP LOG database TO device WITH NORECOVERY
to create the tail-log backup, then you can perform the RESTORE operation. The NORECOVERY option sets the database into a state where a RESTORE operation can be performed, preventing changes to the database after the tail-log backup has been created.
As with BACKUP, the RESTORE statement provides a number of options. Several of these are related to the integrity of the backups, such as the option CHECKSUM, which verifies the checksums of the restored data. If the backup lacks checksums, an error message is generated. If a checksum fails, by default the RESTORE operation will halt with an error, but you can force the RESTORE to continue despite the error with the option CONTINUE_AFTER_ERROR. The NO_CHECKSUM option disables the checksum routine, allowing a restoration to continue even if the restored data has corruption issues.
A useful RESTORE option is MOVE, which allows the restored file to be placed in a specific location, allowing restored files to be placed in locations that do not conflict with existing files or allowing several files to be combined into a new file.
RESTORE DATABASE mytable FROM DISK = 'z:\backups\mybackup.file' WITH MOVE 'backup1.dbf' TO 'C:\restorefiles\backup1.dbf'
If you are restoring multiple files in a RESTORE operation, you can specify the different filenames to be moved:
RESTORE DATABASE mytable FROM DISK = 'z:\backups\mybackup.file' WITH MOVE 'backup1.dbf' TO 'C:\restorefiles\backup1.dbf', MOVE 'backup1.ldf' TO 'C:\restorefiles\backup1.ldf'
Passwords are provided for protected backups using the PASSWORD option:
RESTORE DATABASE mytable FROM DISK = 'c:\mybackup.file' WITH CHECKSUM, PASSWORD = 'secret'
To restore just a transaction log, the syntax is similar but using the keyword LOG, here using a tape device with a specific BLOCKSIZE:
RESTORE LOG mylog FROM TAPE = '\tapedrive1' BLOCKSIZE=1024
To obtain a list of all the files in a backup, you can use the FILELISTONLY option, which will list the number and names of the files in the database that would be restored.
There are many more options available with the T-SQL RESTORE command, all of which are described in the Microsoft TechNet reference pages.
Backup-Restore Cycle
A simple example of using the BACKUP and RESTORE cycles should help illustrate the two statements. Assuming we have a catalog called 'master' and we want to back it up to a file called 'masterbackup' on the C:\ drive, the command would be:
BACKUP DATABASE master TO DISK='C:\masterbackup'
To list the files in the backup, the command would be:
RESTORE FILELISTONLY FROM DISK='c:\masterbackup'
And finally, to restore the files from the backup, the command would be:
RESTORE DATABASE master FROM DISK='c:\masterbackup'
To restore the database and move the restored file to a new location, the command would be:
RESTORE DATABASE master FROM DISK='c:\masterbackup' WITH MOVE 'master' TO 'C:\restoredmaster'
To restore a specific file from the backups, you can use the FILE option:
RESTORE DATABASE master FILE = 'myfile' FROM DISK='c:\masterbackup'
When combined with any of the multiple options available to both BACKUP and RESTORE, the backup cycle can be customized as needed, but most people will find the basic syntax of the two statements are enough for their purposes.
|
|