|
An overview about the iPhone SDK
The iPhone SDK was announced officially on March 6, 2008, the first beta release was on July 11, 2008 which demanded a firmware update for all iPhone and iPod users. The SDK continued to develop with time until the Beta3 update to the 2.1 SDK was released on August 8, 2008.
Here is a small timeline.
|
Date of release
|
SDK Version release
|
iPhone OS Version
|
|
March 6, 2008
|
First beta
|
1.2b1
|
|
March 27, 2008
|
Beta 2
|
2.0b2
|
|
April 8, 2008
|
Beta 3
|
2.0b3
|
|
April 23, 2008
|
Beta 4
|
2.0b4
|
|
May 6, 2008
|
Beta 5
|
2.0b5
|
|
May 29, 2008
|
Beta 6
|
2.0b6
|
|
June 9, 2008
|
Beta 7
|
2.0b7
|
|
June 26, 2008
|
Beta 8
|
2.0b8
|
|
July 24, 2008
|
First Beta for OS v2.0
|
2.1
|
|
July 30, 2008
|
Beta 2 update v2.0
|
2.1
|
|
August 8, 2008
|
Beta 3 update v2.0
|
2.1
|
The iPhone SDK package contents
The SDK is broken down to the following:
Cocoa Touch
The Cocoa Touch layer is one of the most important layers in iPhone OS. It comprises the UIKit and Foundation frameworks (UIKit.framework and Foundation.framework), which provide the basic tools and infrastructure you need to implement graphical, event-driven applications in iPhone OS.
It also includes several other frameworks that provide key services for accessing device features, such as the user’s contacts.
This framework is used to implement the core set of features.
- Application management
- Graphics and windowing support
- Event-handling support
- User interface management
- Objects representing the standard system views and controls
- Support for text and web content
- Accelerometer data
- The built-in camera (where present)
- The user’s photo library
- Device-specific information
Media
The graphics and media technologies in iPhone OS are geared toward creating the best multimedia experience available on a mobile device. More importantly, these technologies were designed to make it easy for you to build good-looking and -sounding applications quickly. The high-level frameworks in iPhone OS make it easy to create advanced graphics and animations quickly, while the low-level frameworks provide you with access to the tools you need to do things exactly the way you want.
- OpenAL
- Audio mixing and recording
- Video playback
- Image file formats
- Quatrz
- Core Animation
- OpenGL ES
Core Services
The Core Services layer provides the fundamental system services that all applications use. Even if you do not use these technologies directly, every other technology in the system is built on top of them.
- Networking
- Embedded SQLite database
- GeoLocation
- Threads
OS X Kernel
The Core OS layer encompasses the kernel environment, drivers, and basic interfaces of the operating system. The kernel itself is based on Mach and is responsible for every aspect of the operating system. It manages the virtual memory system, threads, file system, network, and inter-process communication.
The drivers at this layer also provide the interface between the available hardware and the system frameworks that vend hardware features. Access to kernel and drivers is restricted to a limited set of system frameworks and applications. iPhone OS provides a set of interfaces for accessing many low-level features of the operating system.
Your application accesses these features through the LibSystem library. The interfaces are C-based and provide support for the following:
- Threading (POSIX threads)
- Networking (BSD sockets)
- File-system access
- Standard I/O
- Bonjour and DNS services
- Locale information
- Memory allocation
Develop your first iPhone application:
Things you need before going any further:
- A “MAC OS X” platform of version 10.5.3 or later. You can get an original MAC box or you can simply get one of the hacked versions of the MAC OS, for more information click here.
- The iPhone SDK “Software Development Kit” you can get one from the iPhone developer program home page, or simply click here.
- Xcode, the IDE “Integrated Development Environment” used to develop applications and software for MAC based platforms. Although one of Xcode’s goals is to reduce the time you spend writing code, you still devote a considerable part of your development in the text editor. To that end, the text and source editor provide many features with the aim of making your source-code editing a productive and efficient endeavor. Code folding, code completion, Edit All in Scope, Refactoring, and other features allow you to focus your attention on the right areas and to use your time as efficiently as possible. It’s packed with the iPhone installer, so no need to worry about it.
- Interface builder, this application lets you design compelling user interfaces graphically. Your work is saved as nib files that your application loads at runtime. This means that you what you design is exactly what users of your application see; you work with the actual controls that iPhone OS places on the users’ screens. It also means that you spend less effort codifying the user-interface–related aspects of your application in source code. It’s also supplied in the SDK package.
Other developing applications you may use:
- Debugger, as you start testing your application, you may need to step through your code to the cause of unexpected behavior. Xcode’s debugging facilities provide the usual debugging features, such as breakpoints, viewing variables, and so forth. But Xcode provides these and other debugging features right in the text editor. That is, you can make a change in your code, add a breakpoint, start your application, and perform most debugging tasks in the same window.
- Instruments, as you near the end of the development process, you must ensure your application uses the resources of the device on which it’s running as efficiently as possible, so that battery power is not wasted and your application does not gather system resources unnecessarily. “Instruments” shows your application’s resource usage, including memory, CPU, and network, in a graphical timeline that lets you see how your application behaves over time.
The MVC design pattern:
The structure of iPhone applications is based on the Model-View-Controller (MVC) design pattern because it benefits object-oriented programs in several ways. MVC–based programs tend to be more adaptable to changing requirements—in other words, they are more easily extensible than programs that do not use MVC. Furthermore, the objects in these programs tend to be more reusable and their interfaces tend to be better defined.
In the MVC design pattern, the model layer consists of objects that represent the data your application manages. The objects in this layer should be organized in the way that makes the most sense for the data. External interactions with model objects occur through a well-defined set of interfaces, whose job is to ensure the integrity of the underlying data at all times.
The view layer defines the presentation format and appearance of the application. This layer consists of your application’s windows, views, and controls. The views can be standard system views or custom views you create. You configure these views to display the data from your model objects in an appropriate way. In addition, your view objects need to generate notifications in response to events and user interactions with that data.
The controller layer acts as the bridge between the model and view layers. It receives the notifications generated by the view layer and uses them to make the corresponding changes in the data model. Similarly, if the data in the data layer changes for other reasons (perhaps because of some internal computation loop), it notifies an appropriate controller object, which then updates the views.
Developing the iCalculator application:
Here is a fast overview of what we will do:
- Creating the project.
- Implementing the Model Object.
- Implementing the Controller Object.
- Implementing the View Object by use of the “Interface Builder”.
- Customizing the app delegate to incorporate the view controller object, and add it to the application window.
- Connecting the view controller to its view.
- Finalizing the application and setting its icon.
Creating the project
1) Launch Xcode. You can find it in the developer folder > Applications > Xcode.
2) Choose File > New Project.
3) Choose from the iPhone OS templates.
4) Choose Window-Based Application.
5) Name your project “iCalculator”.
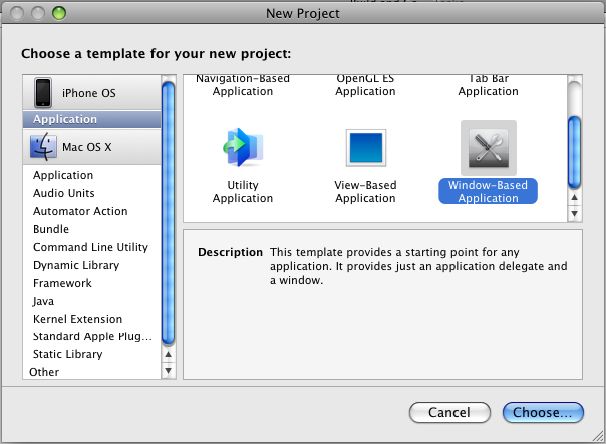
Figure 1: New Project.
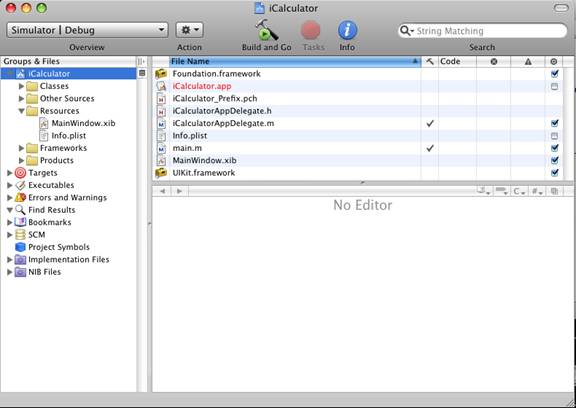
Figure 2: The iCalculator Project.
Note:
■ iCalculator.app: The application binary, the project’s product. It’s in red because the product hasn’t been built yet.
■ iCalculatorAppDelegate.h, iCalculatorAppDelegate.m: The files that implement the application’s delegate.
■ MainWindow.xib: The nib file that defines the application’s main window. Despite its name, iPhone applications normally have only one window.
Implementing the Model Object
We will create a new class whose instance represents an object of the calculator, follow the following steps:
1) Click on the “Classes” folder.
2) Choose File > New File.
3) Choose Cocoa Touch Classes > NSObject subclass.
4) Name the class “iCalculator”, make sure that creating the header file option is selected.
5) Insert the following Code into iCalculator.h:
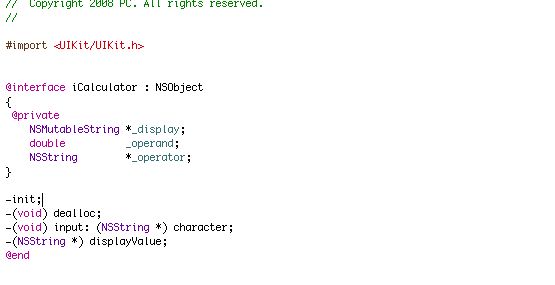
Figure 3: iCalculator.h.
6) Insert the following Code into iCalculator
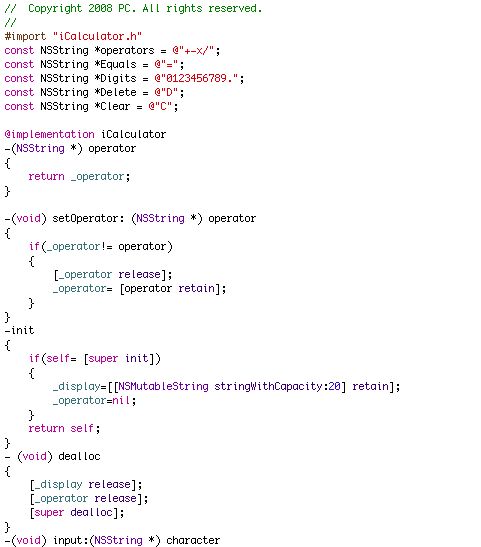
Figure 4: iCalculator.m part I.
Notes for newbies:
1) The “retain” and “release” methods are used mainly in the memory management of iPhone applications, that’s because there isn’t any garbage collection in the iPhone OS.
Thus, memory management is done manually; you can’t simply call “dealloc” to free the resources and references of a certain object, because this object may contain references to other objects that will not be de-allocated, and thus will cause memory leaks, so we use retain which will increment the value of a certain variable for this instantiated object, and release decrements the value, and when it reaches zero, the referenced object is de-allocated.
For more information about this topic, read more about memory management in Objective C++ 2.0.
2) If ( Self = [ super init ] )
What does this mean? This means that init of the parent class “NSObject” function will be called and if self is not equals to null do the following.
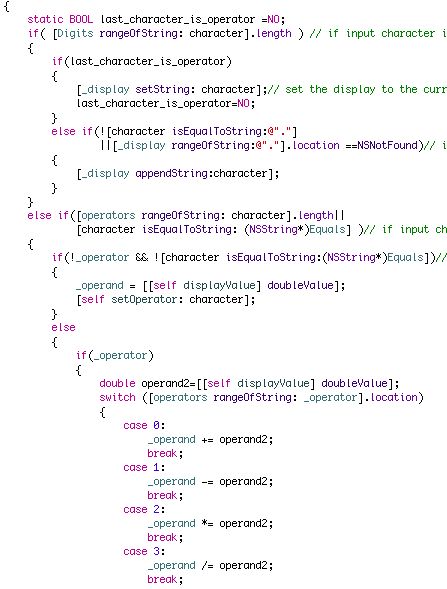
Figure 5: iCalculator.m part II.
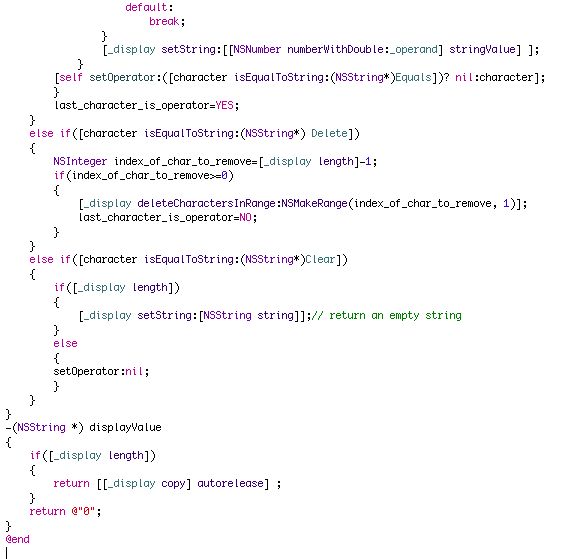
Figure 6: iCalculator.m part III.
Implementing the controller object:
1) Click on classes.
2) Choose File > New File
3) Choose iPhone OS> Cocoa Touch Classes > UIViewController subclass.
4) Name the class “iCalcViewController”.
5) Modify the iCalcViewController.h header file as the following:
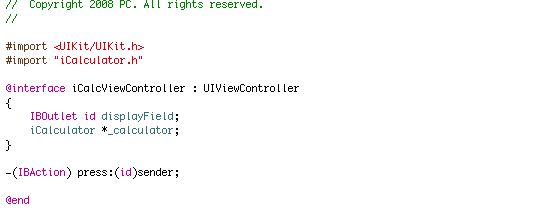
Figure 7: iCalcViewController.h
6) Modify the iCalcViewController.m file as the following:
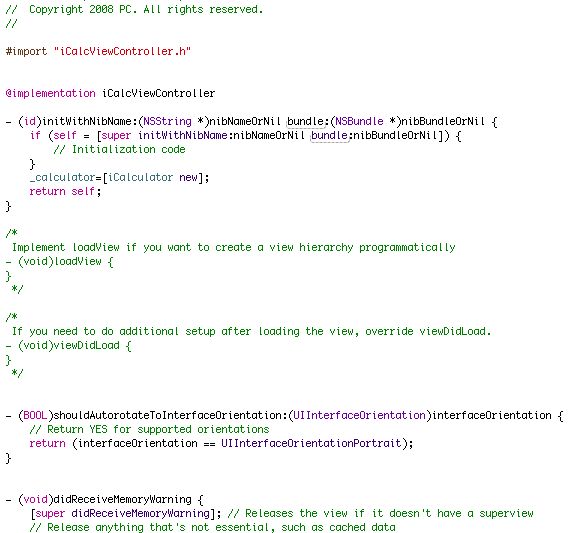
Figure 8: iCalcViewController.m part I.
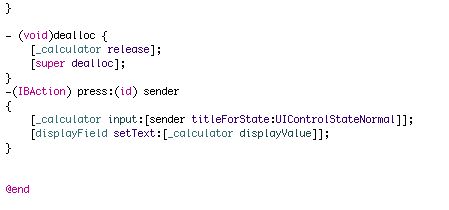
Figure 9: iCalcViewController.m part II.
Implementing the View Object
To get users excited about your application, it should have the best user interface possible. Interface Builder allows you to build beautiful, more importantly, useful user interfaces by dragging controls from a library of user-interface elements and laying them out n a view as you want them to appear to the user, your user-interface designs are known nib files. Your application loads these resources at runtime to reconstitute the use interface you designed. This means that you can make substantial changes to the user interface layout (and even some behavior) without having to edit source code. This is the main benefit of the Model-View-Controller paradigm.
1) Expand the “Resources” folder.
2) Double click on “mainWindow.xib” and the interface builder will open.
3) From the interface builder choose File > New file.
4) Choose Cocoa Touch and then press on View.
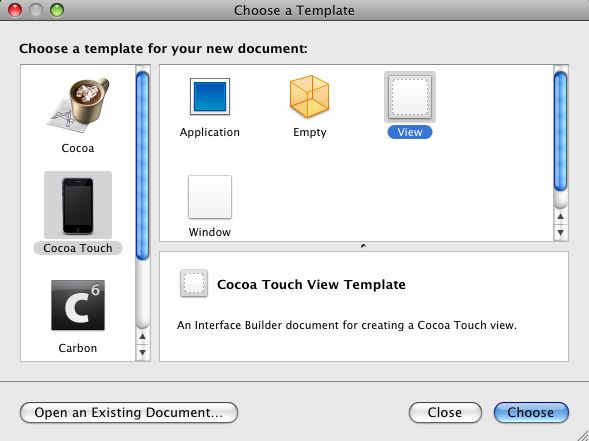
Figure 10: iPhone OS UI templates.
5) Choose save, name it as “CalcView” and navigate till you reach the location of your project and save it under the “Resources” folder and press ok.
6) Xcode will ask you to update the project to accommodate the new file, confirm this process.
7) Press on the File’s Owner icon.
a. Choose Tools > Inspector.
b. Display the identity pane.
c. In the Class text field enter “iCalcViewController”, note that it will auto-complete.
And by this way, we’ve connected between our view object and the controller object.
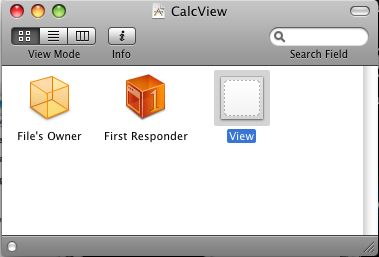
Figure 11: “calcView”’s Components.
8) Press on the View icon.
a. Choose the Inspector Attribute pane.
b. Customize your view as you desire, here we changed the background’s color to black.
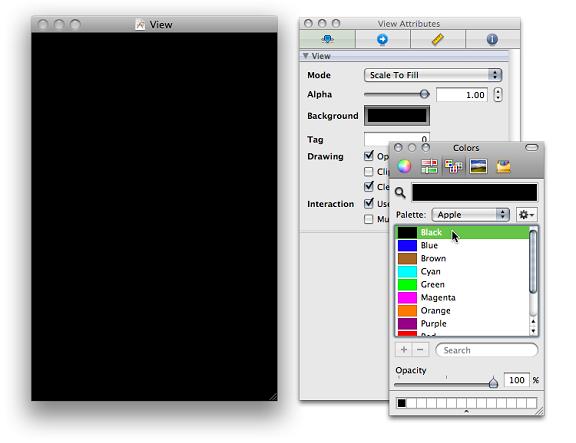
Figure 12: “calcView”’s View designer.
9) Add input and output controls to the view
a. Choose tools > Library.
b. In the organization pane, select Library > Cocoa Touch Plug-in > Inputs & Values.
c. Select the Text Field item and drag it to the View.
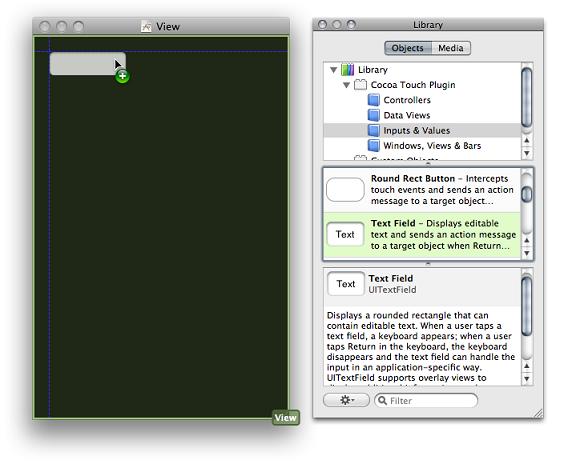
Figure 13: Drag and drop components.
d. Resize the text field, by enlarging it, such that it contained by most of the view’s width.
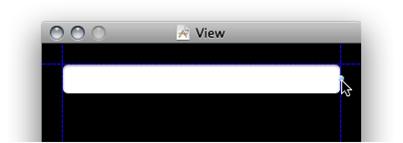
Figure 14: resize text field.
e. Display the Inspector Attribute pane.
f. Set the text field text to 0.
g. Set the alignment to right-align.
h. Set the title typeface and size, by setting the focus on the text field in the view > Choose Fonts, set it to bold and size 36.
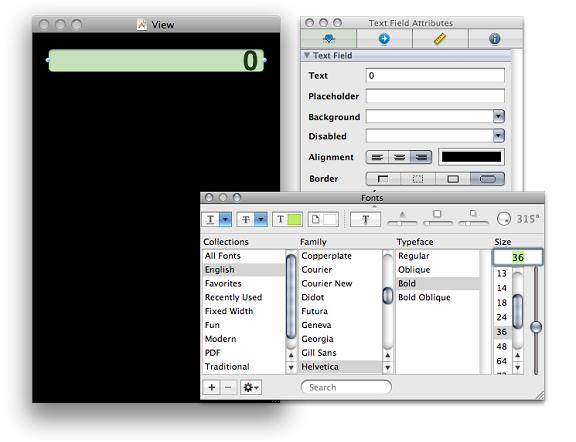
Figure 15: Set font.
i. Add a rectangular button.
- Choose “Round Rect Button” from the library and drag and drop.
- In the inspector size pane, set the button’s width to 64 and height to 70.

Figure 16: Set font.
- Connect the button’s “Touch Down” event to the “press:” action method of the “iCalcViewController” class.
- Select the button in the view
- Display the Inspector Attributes pane.
- Set the title color to black.
- Set the button title to 7.
- Set the font size to 48.
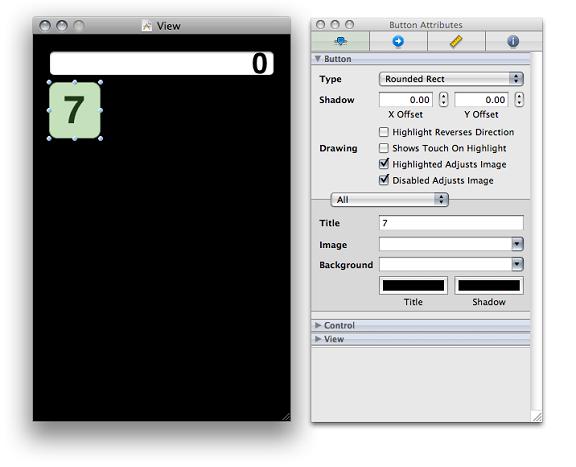
Figure 17: Set button attributes.
j. Create the button grid:
- Choose the button from the view.
- Choose Edit > Duplicate.
- Position the clone beside the original button.
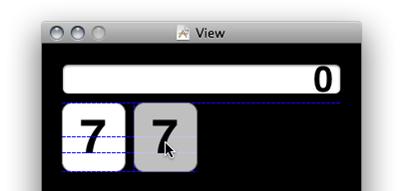
Figure 18: Clone the button.
- Select both buttons and do exactly as the previous steps.
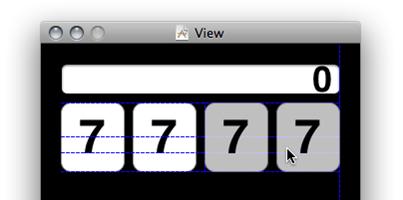
Figure 19: Clone the two buttons.
- Select the four buttons and with the same steps we can generate the following view.
- But by changing the text of each button and making sure that the action event of each button is the “press” method
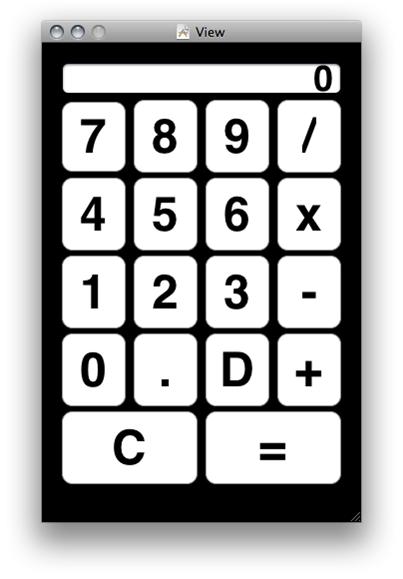
Figure 20: The final calculator view.
Editing the application delegate:
1) Double click on the iCalculatorAppDelegate.h to modify it, edit it to look like this:
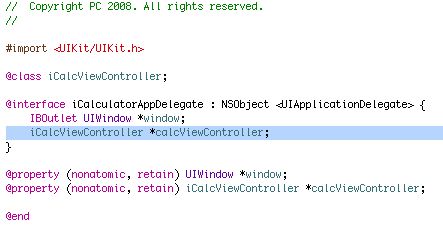
Figure 21: iCalculatorAppDelegate.h.
2) Double click on the iCalculatorAppDelegate.m to modify it, edit it to look like this:
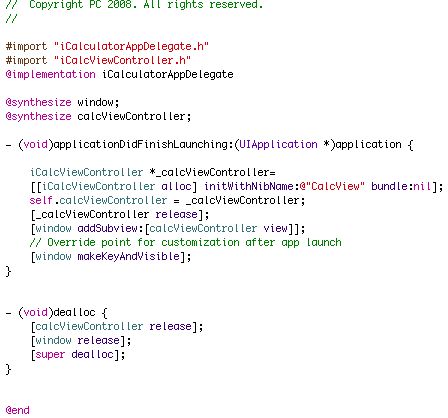
Figure 22: iCalculatorAppDelegate.m.
Connecting the View controller to the View
As mentioned before, we have connected between the view and the controller, but that was an initial connection.
We have to be more precise, for example we have to mention which controls do certain actions, and which preview certain data, so here is what we have to do:
1. In the CalcView.xib window, select the File’s Owner proxy (which represents an instance of the “CalcViewController” class).
2. In the Inspector Connections pane, connect the displayField outlet to the text field in the view.
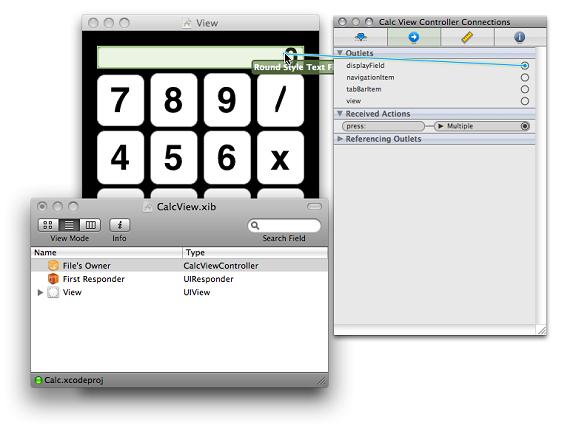
Figure 23: Connecting the view with the controller.
3. Connect the view outlet to the view.
4. Save the “CalcView.xib” file.
Note: If you pressed on one of the buttons, you will find that their action event handler is already set, as we set it before during designing the view to the “press” function.
Setting the application icon
1. In Interface Builder, take a snapshot of the Calc button grid:
a) Place the pointer at the top-left corner of the grid.
b) Press Shift-Comand-4 and hold down the mouse button.
c) Drag the pointer to the bottom-right corner of the grid and release the mouse button.
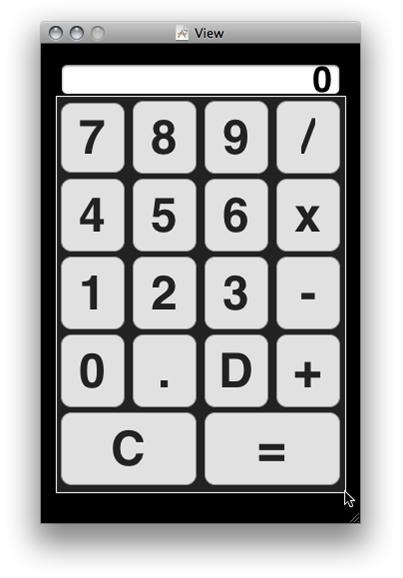
Figure 24: Taking a snapshot.
Mac OS X places the snapshot file in your desktop using the name Picture 1.jpg (or a name with a higher number if you’ve captured other snapshots).
2. Rename the snapshot file, icon.jpg.
3. In the Groups & Files list, select Resources.
4. Choose Project > Add to Project.
5. Navigate to your Desktop directory and choose icon.jpg.
6. In the dialog that appears, ensure the copy option is selected, and click Add.
7. In the Groups & Files list, double-click Resources > Info.plist.
8. In the editor window, set the value of the Icon file key to icon.jpg,
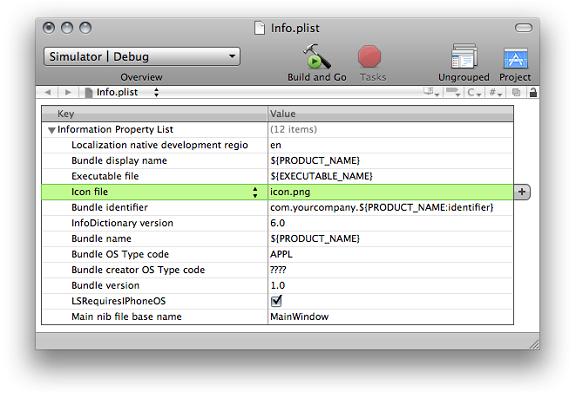
Figure 24:Info.plist.
9. Save the Info.plist file.
Running your application
Build your application and run it on your simulator, if you have an iPhone connected to Xcode you can choose to deploy and run on it.
Please not that, you have to have a developer’s certificate from apple to develop for iPhones, which will cost you $99 or $299 a year depending on what kind of certificate you want, for more details click here.
Download Article Source Code Below (Must be registered user, registration is free!)
|