This demonstration illustrates the use of using Dynamic Forms with several features added within the 2.5 release. A few features implemented showcase using client events to calculate a total field based on a checkbox group, show pop up bubble text when you are focused on a field, and integration with Authorizenet to process credit card payments with Dynamic Forms. Below is a breakdown of each field and how the module is configured and how each field is set up.
- This module is configured to hide the help icons which are optionally displayed. This setting is setup under 'Module Configuration', 'General Settings' area.
- The short field names for most of the fields were named to allow for applications such as 'Google Auto Fill' to be able to detect the field name and automatically be able to Auto Fill content within the form.
- On most fields setup, there is a specific setting under 'Advanced Field Settings', 'Look & Feel', which displays the help text as a pop up text to the right of the field. The width for the pop up text can be defined for each field and is setup as 200 for the fields below.
- Note: The ability to offer pop up bubble help/text is a new feature offered in version 2.5 of Dynamic Forms.
- The settings for pop up /bubble up text can be defined within the stylesheet area under Module Configuration, Layout / Stylesheet, Stylesheet. Within this area you can define the bubble up font, background color, border, etc... The bubble background was setup within this demonstration to match our sites skin/stylesheet colors.
- This demonstration outlines the ability to quickly calculate a checkbox group list and generate a total to the right of the checkbox group. This is handled with several steps....
- Setup a checkbox group, define each checkbox group item with either a integer (value) amount. The text option for the checkbox group item does not need to be an integer value.
- Under advanced field options there is a client side event to calculate the fields and set the value of an html field to be the total field calculation.

- Note a few parts of this client side event.
- The first part is specifying a DIV which we will setup in the next step called "Total". We are setting the variable to some text, and passing but Products FieldID and Value FieldID to the CalculateCheckBoxListValues function call.
- The CalculateCheckBoxListValues function is a built in function which is included within Dynamic Forms. You can review this function if you go to Module Configuration, Javascript File
- The next step to set this process up is to create the HTML field. This field we specified a basic HTML field and added a DIV tag called 'Total'. We also specified other optional settings for this HTML field to 'Add the field to the same row as previous question'. This is how the HTML field shows up to the right hand side of the check box group field.
- This DIV tag should look similar to this when you view the source within the Rich Text Editor:
- <div id="Total"><strong>Your total comes to: $0.00</strong></div>
- This demonstration outlines the ability to enable Dynamic Forms with Authorizenet Merchant ability. Authorizenet is a leading merchant provide to process credit cards. Note: For more information on Authoriznet you can visit http://www.authorizenet.com
- In order to setup a configuration for Authorizenet you need to create fields for a Credit Card Number, Expiration Date, and any other information you want to pass along to Authorizenet. This might include their address, company name, price, etc... In this example we are collecting some basic contact information, their credit card and expiration date, and we will end up using the checkbox group for the total. Keep in mind that the short field names for each field you setup will be used later so give them meaningful names.
- To enable Authorizenet payment gateway navigate to Module Configuration, Payment Gateway. In this example we have enabled the payment gateway and checked the box to enable the gateway in test mode.
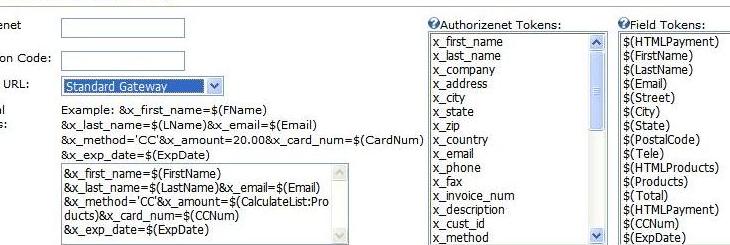
- Expand the settings for the Authorizenet Gateway. Here you will specify your Authorizenet Login and the Transaction Key from Authorizenet. These are all settings that you must get from your Authorizenet merchant account. If you have a live merchant account you should select 'Standard Gateway' from the Gateway URL setting. If you only have a developers account with Authorizenet you should select the 'Developer Test Gateway' setting.
- The additional parameters are of the Authorizenet integration is the key area. You will see two listbox's of tokens. One listbox shows available Authorizenet tokens (such as x_first_name) and the other listbox shows short field name tokens for your dynamic fields. You will want to format the additional parameters in the easy format of &AuthorizenetToken=$(DynamicToken)&AuthorizenetToken2=$(DynamicToken2) etc... This is how you can pass as much (or as little) information to the Authorizenet system as you would like. Note: In this particular form demonstration we are using one additional token that is new to version 2.5. This token is: $(CalculateList:ShortFieldName). This will calculate and create a total for the checkbox group (similar to the client side function which created a total on the fly).

 Would you like to setup your form just as this demonstration is setup? If so simply download this template and copy it to your DNN Portals Home Directory to use the IPORTABLE feature of the module (Select Import Content from the module menu and import the template): Would you like to setup your form just as this demonstration is setup? If so simply download this template and copy it to your DNN Portals Home Directory to use the IPORTABLE feature of the module (Select Import Content from the module menu and import the template): |