A quick dip into ASP.Net MVC for ASP.Net Webforms Users
The introduction of ASP.Net MVC has pleased a large segment of ASP.Net programmers who were thirsting to go beyond the often clunky page-driven model of ASP.Net.
MVC or Model-View-Controller is a programming pattern that makes code more organized and testable, improving maintainability. These are key requirements if you’re making a professional, enterprise level application, or are trying to make the next big hit on the world-wide-web.
ASP.Net MVC is built on the top of the same ASP.Net technologies that we’ve been using since years. By re-writing some of the rules of classic ASP.Net, the engineers of the MVC team have brought us full MVC functionality, creating an all new way to program in ASP.Net.
The components of MVC
MVC stands for Model-View-Controller. In this classic pattern, the program is divided into three distinct parts.
Model – The part that does all the background processing, the database work, the business logic. The Model just processes information. It either stores, retrieves, or re-shapes it. The Model does not have a say in what the information is used for, or how it is presented to the user.
View – The View is what the user sees on-screen. The View lets the user see the information, work on it and save the changes to the application. In the MVC pattern the View does not contain the logic to process the information, merely to present it.
Controller – The Controller acts as a bridge between the Model and the View. The information that is processed by the Model is presented by the View and it is the controller that decides what information is presented and processed.
So as you can see the entire program is divided into three units and you store the relevant code for each unit in that portion only. By adhering to the rules of Model-View-Controller pattern, you can make complex apps easier to develop and make teamwork easier as different people can work on different parts of the project without disturbing others.
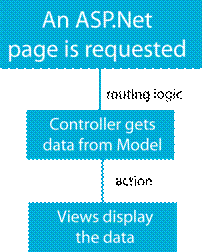
ASP.Net MVC Control Flow
Thinking in MVC
Working with MVC requires a very different thought process than working in Webforms. In ASP.Net webforms we are used to assuming that the name of the URL has a direct relationship with the file which contains the HTML markup and code. Many of us also use the ASP.Net page to process the business as well as presentation logic.
In MVC the business, database and presentation logic are different layers. Each layer works pretty much independently and passes on the execution to its successor when it is done with its job.
ASP.Net MVC makes the use of URL routing to implement the MVC pattern. Instead of containing the path to the ASPX page, the URL has the details of the Controller and the Action (More about Actions later), which in turn decide what data to display.
So the first thing you need to do to work with MVC is to switch off your Webforms brain and start learning the technology like a beginner.
How to Set up ASP.Net MVC on Your PC
ASP.Net MVC will be a standard component in Visual Studio 2010. Till then however we must install it separately on Microsoft Visual Studio. MVC can be installed on any edition of Visual Studio 2009, even the express edition.
Before installing MVC, get the latest patches for Visual Studio to make sure the IDE is updated and capable of working with MVC. You should also get ASP.Net 3.5 framework SP1 upgrade.
Download the MVC installation from http://www.asp.net/mvc/download/.
Making an ASP.Net MVC Application
If you’ve successfully installed ASP.Net MVC on your computer, you’ll see a new project type of ‘ASP.Net MVC Web Application’ in your Visual Studio File->Project->Web dialog.
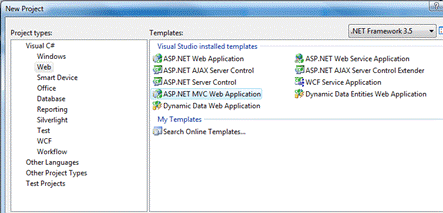
Select this project type and click OK to create your Asp.Net MVC project. Visual Studio will also prompt you to create a Unit Test project. If you are interested in Test Driven Development (TDD) then create the Unit Test project too otherwise select ‘Do not create the test project’.
A new project of type ASP.Net MVC is not an empty project. Instead you’ll get a template application with several pages that you must delete/modify to make your own application. Because making even a trivial MVC application requires many steps, Microsoft has provided the template that will help you learn the structure of the MVC application.
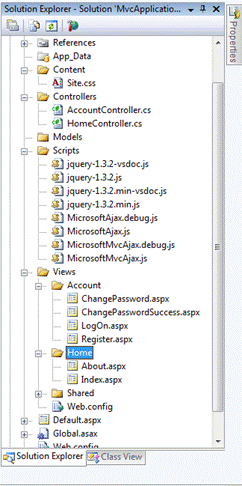 Here’s the structure of the initial MVC application in the graphic. Notice the big number of files that are already a part of the project. ASP.Net MVC introduced the following folders.
Content
You can keep all your website related content here, including CSS files, xml data, images, etc.
Controllers
The controllers folder stores your controller classes that have the responsibility of extracting the data from the models and then passing the control over to the correct View using Actions.
Models
All the code classes that have your business or data retrieval logic go here.
Scripts
Keep all your javascript files here. Microsoft is integrating ASP.Net MVC tightly with JQuery, so you’ll find that JQuery files are already a part of the project.
Views
The views folder should have the files that will handle the displaying of the data to the visitors. The view files should be in a folder with the same name as that of the controller. There is a naming convention for individual files in the Views folder too. We’ll learn about it after we have understood what Actions do.
Views are like your standard ASP.Net .aspx files but they cannot have a code-behind file so you’ll have to do all coding in the same page as the HTML itself. You’re also supposed to use only standard HTML and there is no more Viewstate to rely upon.
A View can inherit from a Masterpage, have HTML data, contain usercontrols and even contain your C#/VB.Net code.
What are Actions?
Here’s the code for HomeController controller class of the ASP.Net MVC template project.
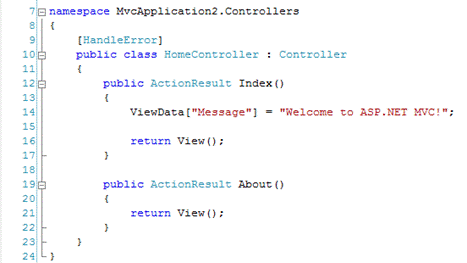
Notice that there are two functions with the return type ActionResult. These are the ‘Actions’ of the controller. Based on the URL requested, the controller calls the appropriate Controller and Action function which can then return a view, redirect the visitor, return javascript, JSON, etc.
Also note that ‘View()’ itself is a function. By default, ‘View()’ looks for an ASPX file with the same name as the Action function, in a subfolder with the same name as the controller class.
Let’s understand that better with a sample URL.
http://www.mywebsite.com/products/walkman
Let’s do a breakdown of the url.
http://www.mywebsite.com
This is the top-level domain name, or the website name which has our ASP.Net MVC application.
Products/
This is the name of the controller, so when a visitor tries to access the URL, ASP.Net MVC will look for a controller named ‘ProductsController’. Why not just ‘Products’? Because according to ASP.Net MVC rules, all controllers must have the suffix ‘Controller’. So if your url has ‘Products’ as the second part, the controller must be named ‘ProductsController’. If your url had ‘Home’ instead of ‘Products’ then the controller would have to be named ‘HomeController’
All the controllers have to be placed in the folder ‘Controllers’.
Walkman/
This is the name of the Action function which will be called inside the Controller. So this URL will call the Action ‘Walkman()’ in ProductsController. The Action can then return a view or other data. Like I said earlier in the article, by default MVC will look for a view with the same name as the Action in the Views/Products folder.
If you want to return a specific view, you can specify its name as an argument to the View function like this:
return View(“Myview”);
This time instead of looking for a view named ‘Walkman’, MVC will look for a view named ‘MyView’.
There can be a third argument in the url. Suppose our url was this:
http://www.mywebsite.com/products/walkman/handy
The last part ‘handy’ would be passed as an argument to the controller. So your controller could look something like this:

In the code above if the Action gets an argument with the value “handy”, it will return the View named ‘Handy.aspx’. Otherwise it will return the Default view named ‘Walkman.aspx”.
Communicating through ViewData
Earlier in the tutorial I said that the View should only have the presentation code and no business or data retrieval logic. So how do you take the information that is to be displayed to the view? The answer is, through ViewData.
The ViewData is a special Dictionary object that you can work with in your Controllers and your Views. You can retrieve the information from your Models, put them in the ViewData and then in your Views, you can retrieve the information from the ViewData and display it.
Thus ViewData acts as a communication bridge between the Controller and the View.
Conclusion
This concludes our quick and dirty introduction to ASP.Net MVC. The best thing about using ASP.Net MVC is that you can afford to forget all the rules I have told you about and code the way you do with classic ASP.Net in your MVC application itself. You will just need to make sure that the pages you create do not have the same name and location as a controller.
This gives you enormous power because you can create hybrid applications that have the features of both ASP.Net classic and MVC.