Configuring and Developing with Facebook API/SDK within ASP.NET (full source code attached bleow)
Download Facebook API Source Code for this (must register first, registration is free!)
Facebook has provided a creative way of social networking since it has opened itself up for application development. Since then a large number of applications have started adding to the user’s Facebook experience. It has provided an exciting new platform for application developers to showcase there talents. Looking at the popularity of this platform, Microsoft released Facebook developer Toolkit to facilitate the development of Facebook applications using the Microsoft Visual Studio 2008(2005 not supported as FDT V2.0 requires .Net V3.5). However, the applications which are still on .NET 2.0 and below can use earlier version of the Facebook developer toolkit i.e. V1.2.
Facebook .NET Developer Kit
Facebook .Net Developer kit contains full source code in both .Net languages (Visual Basic and Visual C#). It also contains several sample programs for each and every Facebook SDK controls. It is built with Drag and Drop controls support for VS 2008.
- Full source code in both the .NET languages Visual Basic and Visual C#
- Samples Programs for each and every Facebook SDK controls
- Samples available for Windows Forms, and also for Microsoft Vista WPF
- Built with Popfly Technology
- Drag and Drop controls supported to Facebook comes with VS 2008.
- FacebookService API
- Album Class
- Photo Class
- FacebookEvent Class
- Group class
- Group User class
- User Class
- SchoolHistory Class
- HighSchool Class
- HighEducation Class
- Network Class
- Location Class
- Work Class
- AsyncFacebook Services.
- Photo API
- Canvas Base pages to Facebook.WebControls
- Ajax samples with IFrame
- Silverlight Examples with IFrame
- New PublishStory and PublishAction interfaces
- CreateAlbum Interface
- GetFriendsNonAppUsers methods
By using this SDK we can build Facebook applications of two varieties:
IFrame and FBML base application. We will study more about this application as we proceed through this article.
Setting up Facebook Developer Account
For creating the face book application we have to first set the developer account:
1) First of all we have to create a Facebook account if we don’t have one already.
2) We have to add a Developer Application to our account.
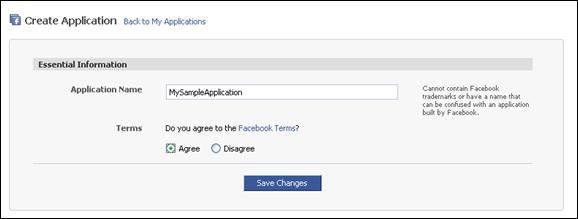
3) Once you've installed the Developer app click Developer application from the left column and click Set Up New Application

4) Enter the Application Name and agree to the TOS and click Save Changes.
5) On the Canvas options tab :
a. Set Canvas Page URL for your application
b. Set Canvas Callback URL : Set the canvas callback url as “http://hosts_file_alias/<your_app_name>/..”
NOTE: Facebook has recently stopped supporting localhost as a valid callback URL. To workaround this problem you can add an alias to your %SystemRoot\System32\drivers\etc\hosts file that refers to localhost as suggested here. Using localhost makes it easy for you to debug locally, note that the port number (nnnn) will be the port you use to debug your application locally using Microsoft's development web server. (Ex: In our case we can set it to http://localhost:/greetuser/default.aspx)
c. Set Render Method to FBML (It will depend upon the type of application you are building).
6) Click Save changes. For more information about each of the Options in Facebook application please click here
Our First Facebook Application
Step 4: Setting up the Web.config. Right Click on the websit link name in the solution explorer and select Add New Item from the right click context menu. Now select Web.config file from the Add New Item dialog box. Now Double click on the Web.config file and open it. In the configuration tag of this file you will find a closed tag for application settings (“<appSettings/>”), replace it with the following code.
|
<appsettings>
<add key="APIKey" value="your API key"></add>
<add key="Secret" value="your secret key "></add>
<add key="Callback" value="http://www.yourwebsite.com/"></add>
</appsettings>
|
You might need to go back to the Developer application in the Facebook to retrieve the values for the API Key the Secret and the Callback URL.
Step 5: In the source of default.aspx page add following line of code under the form tag as follows
|
<form id="form1" runat="server">
<table id="table1" cellpadding="0" cellspacing="10" width="100%">
<tr>
<td colspan="2">
<div>
<asp:Button ID="btnLogin" runat="server" Text="Login" OnClick="btnLogin_Click" />
</div>
</td>
</tr>
<tr>
<td colspan="2">
<asp:Label ID="lblGreet" Visible ="false" runat="server" Text="Hello" Width="112px"></asp:Label>
<asp:Label ID="lblUserName" Visible="false" runat="server" Width="184px"></asp:Label>
</td>
</tr>
</form>
|
Step 6: Click open the default.aspx.cs file in the editor. For the scope of our current application we will add the following user directive in the application:
|
using facebook;
using System.Xml.Linq;
|
Step 7: Define an object of type Facebook services in our Default.aspx.cs class as follows
|
protected facebook.Components.FacebookService _fbService = new facebook.Components.FacebookService();
|
This object will allow us to access all the properties and functions of the Facebook class. Now in the Page load event add the following code snippet.
|
protected void Page_Load(object sender, EventArgs e)
{
//Set the values for our Facebook service object's properties from our
//web config file constants(specific to our application).
_fbService.ApplicationKey = ConfigurationManager.AppSettings["AppKey"];
_fbService.Secret = ConfigurationManager.AppSettings["Secret"];
_fbService.IsDesktopApplication = Convert.ToBoolean(ConfigurationManager.AppSettings["Desktop"]);
try
{
string sessionKey = Session["facebook_session_key"] as String;
string userId = Session["facebook_userId"] as String;
// will will have the auth_token in the query params
string authToken = Request.QueryString["auth_token"];
//We have already established a session on behalf of this user
if (!String.IsNullOrEmpty(sessionKey))
{
_fbService.SessionKey = sessionKey;
_fbService.uid = Convert.ToInt64(userId);
}
// This will be executed when Facebook login redirects to our page
else if (!String.IsNullOrEmpty(authToken))
{
_fbService.CreateSession(authToken);
Session["facebook_session_key"] = _fbService.SessionKey;
Session["facebook_userId"] = _fbService.uid.ToString();
Session["facebook_session_expires"] = _fbService.SessionExpires;
}
}
catch (Exception ex)
{
lblUserName.Text = ex.Message.ToString();
}
|
This function will first authenticate user and then shows the greeting along with the name of the user for the valid user. Here we are first of all setting the values for our API’s ApplicationKey, Secret and IsDesktopApplication properties. Then after authenticating the user we check if we have a valid userId which is passes to our application by the Facebook when we login in our application using our facebook account. When we have a valid user we can excess the _fbService.users Class and using its getInfo method we can obtain our user’s first name and last name.
Setp 8: Now the last step is to add the event on the click of the login button. Now write the following line of code in the btnLogin_Click function.
|
protected void btnLogin_Click(object sender, EventArgs e)
{
Response.Redirect(@"http://www.facebook.com/login.php?api_key=" +
_fbService.ApplicationKey + @"&v=1.0");
}
|
This will redirect the user to the facebook login page hence will facilitate to authenticate the user.That’s it now you can compile and run your application.
Extracting User Profile Details and Friends List for the user:
FaceBook API exposes verious classes, properties and Methods on top of which we can build our applications. To give you an idea about the various classes and methods which we can utilize, here we are extending our application to show the logged on user’s profile and the friends list from facebook.
As we are only extending our previous application here so we can jump directly on step 5 and add the controls that we need on the form.
Step 5: In the source of default.aspx page add following line of code under the form tag as follows
|
<tr>
<td width="50%">
<cc1:UserProfile ID="UserProfile1" Visible="false" runat="server" /></td>
<td><asp:ListBox ID="lstFriends" runat="server" Visible="false"></asp:ListBox></td>
</tr>
|
Here we are using the facebook’s inbuilt web control for showing the user profile.
Step 6:It will remain the same as above, but now as we have to show the friends list, for which we will be using the IList type of object and so we need to add one more user directives in our Default.aspx.cs class.
|
using System.Collections.Generic;
|
Step 7: As Facebook provides its own inbuilt web control for displaying the user profile. For showing the friends list in a listbox we have to first collect the Id’s of all the friends of the user from the friends class of Facebook API and then obtaining the Info of each friend by passing there Ids to the _fbService.users.getInfo() Method. Once we have the information of a friend we can add their name to our list box. Using the listbox’s
|
String uids = String.Empty;
IList<facebook.Schema.user> userFriendsInfo;
friends friendUid = new friends(_fbService.API);
IList<long> ids = friendUid.get();
for (int i = 0; i < ids.Count; i++)
{
uids = uids + "," + ids[i];
}
if (uids != String.Empty)
{
userFriendsInfo = _fbService.users.getInfo(uids);
foreach (facebook.Schema.user u in userFriendsInfo)
{
lstFriends.Items.Add(u.name);
}
|
Step 8: Just compile and run your application now. You should be able to see the logged on user’s profile and list of friends in the list box.
Some Common problems
First and the most important thing that I have mentioned above as well is that this API/ SDK V2.0 works with .NET framework 3.5 and above. So if you want to work with VS 2005 then make sure either you have .Net V3.5 installed on you machine or you have to use older version of the toolkit.
Secondly a very handy thing that the Facebook API classes provide is the freedom to utilize the user profile XML in your application. Facebook API method _fbService.users.getInfo() return IList type value. So you need to write a method to conver IList to List type so that the new type can be serialized to XML.
Also if your application has anything to do with the messaging, notification or emailing, then you might want to check for the conditions that Facebook has forced upon the useage of these classes. All the information that you need in this regard can be obtained from the following hyperlink Facebook Developers wiki
Happy Programming!!
Download Facebook API Source Code for this (must register first, registration is free!)